


RAAF 011-118
Vessel numberHV000846
Previous owner
Royal Australian Air Force
Builder
Slazengers Ltd
Date1945
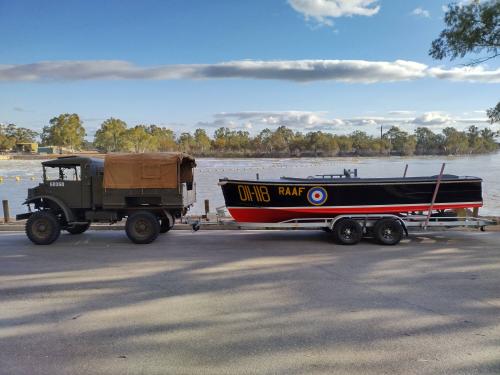
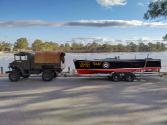
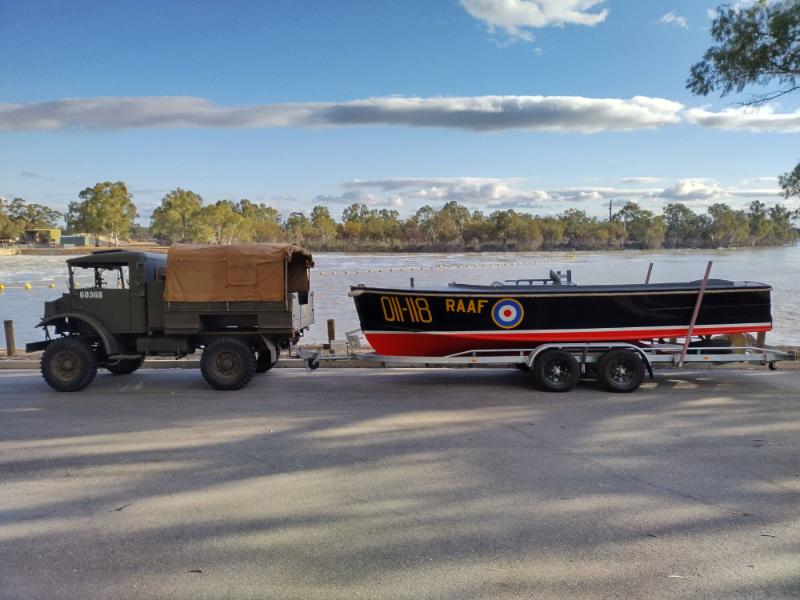
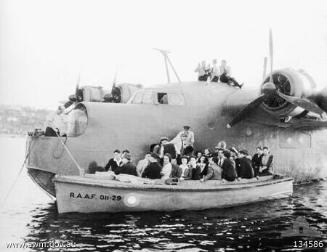
DescriptionRAAF 011-118 is a workboat that was built for the RAAF in 1945. It was built by Slazenger and issued to the RAAF in September 1945 indicating that it did not see war service. 011-118 was one of 120 02 class workboats manufactured for the RAAF. It was struck off charge and declared for disposal in 1954 (information provided by David Gardiner Senior Air force curator RAAF Base Point Cook). It is 22.5ft (6.7m) in length and has a large cockpit with narrow side decks, a foredeck, a short aft deck, and a planing hull. It was of chine plywood construction, and had a towing post abaft the engine casing. It is similar to RAAF 011-29 (HV000427) a carvel planked launch that supported the Catalina and Sunderland flying boats that patrolled looking for Japanese submarines off the NSW coastline.These vessels were built as part of a massive war effort around the country which saw commercial and pleasure craft builders employed to build small to medium sized workboats and launches. These craft acted as support vessels for enclosed water duties all around Australia and further north where action took place. A series of the RAAF 011 boats were built by Slazenger, such as RAAF 011-118, the company operating workshops in Sydney and Newcastle. The boats were built in batches with consecutive numbers.
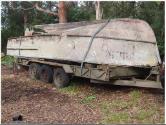
In 2005 RAAF 011-118 was pulled from the water in Paynesville Victoria near the Gippsland Lakes and left to deteriorate under a canopy of trees. Upon recovery, the vessel displayed its 011-118 number on the outside of its hull. Prior to this, in 1991, RAAF 011-118 was painted grey for display at the 50th anniversary of the Bairnsdale RAAF Base. It had also undergone a full rebuild at the Paynesville Shipyard. In 1994/5 further work on RAAF 011-118 was undertaken, and at this time the RAAF logo and the registration of the craft was etched into both sides of the hull. Painting was done as per the original etched outlines and colours (information provided by Andrew Bould at Paynesville Maritime Museum). In 2013 the vessel was passed on to the current owner who commence an extensive restoration process on the vessel.
RAAF 011-118 has gone through an impressive extensive rebuild with many new materials used in the reconstruction process. This process is almost complete, with final works to be done on the propeller shaft and installing the motor in 2022. Original components restored in the vessel include 7 refurbished timbers, reused copper nails and roves, and the original rudder. The following is an extract from an online blog charting the restoration and re-build process:
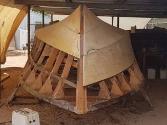
“This vessel came from a collector I knew in Paynesville Victoria. The boat was gutted inside and I had no idea what the interior looked like. My greatest concern was the keel. There was a wedge-shaped gap between the two large sections that made up the rear half, and the brass fitting that held the propeller shaft at the prop had sunk into the hull. I began removing the plywood sheets from the forward undersection of the hull. My plan was to expose the structure of the keel, assess what was wrong and correct it. I would need to rebuild the transom (back of the boat) first then work my way forward to the front, rebuilding and strengthening the backbone before repairing the ribs and finally reskinning the outside.
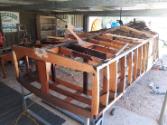
Of course, I was anticipating that some of the original timbers could be reused. This 011’s ribs are split into 2 pieces “bottom and side”, braced on both sides at the join by a piece of ½ inch marine ply and all secured together with copper nails and roves. This is because the hull of the boat is squarish in cross section due to its plywood construction. Because the plywood bracing covered the end sections of each rib timber, most of the ribs looked to be in reasonable condition. Once removed it was a different story. The ends of a large percentage of rib timbers once exposed were so rotten that I could push a screwdriver right through them, some of them crumbled in my hands. The surprising thing was that the boat had remained in one piece on its travels from Paynesville, Vic, to Overland Corner, SA, probably an indication of how solid the hull was designed and built in the first place. A lot of ribs had mild steel fasteners that were used to secure outer sheets at some time during the boat’s life which had rusted and expanded weakening the timber. Although still strong they had a weak point that may fail in the future if reused. By the time I had restored the frame 6 ribs from the back of the boat, I had replaced 69 timbers and refurbished 7.
Each rib had taken on average a day to restore. Unpicking the ribs copper nails and corroded brass screws careful not to damage the pieces further so they could be repaired and reused, or used for templates if they needed replacing. All of the original plywood required replacing. Some other timbers were so soaked with oil from the engine that the epoxy resin I was using to glue the boat back together would not stick. (I bought a) Chrysler six cylinder motor almost complete although it was missing the generator, factory inlet manifold and carburettors. It had been stored outside for some time, so it was no surprise to find water damage to 2 of the cylinders. The rest of the motor and gearbox was in good order with old but clean oil in them that had protected the internals from corrosion.
By early 2019 the skin was completed and replacing the keel was the next job on the list. The original keel was in 2 sections with a butt join about a third of the way from the front. Most likely a result of a bad repair some time during the boats life. It also had damage from rot and was mostly unsuitable to be reused for its original purpose except as a pattern for a new timber. Being the backbone of the boat I needed the keel to be strong with no joins. I needed a piece of Karri timber 65mm thick, 280mm tall and 5.7 meters long. The piece of timber selected came from an old roof beam of the recently demolished Berri winery, a 20-minute easterly drive from my house.
Next I needed to fit the remainder (more than 1000) of the stainless screws needed to strengthen the epoxy glue join that held the skin onto the ribs. Keeping in mind to use the appropriate fastener for the task (a lesson I previously learnt) I used 30 mm wood screws pilot hole drilled and counter sunk. These replaced the original copper nails and roves although I planned to fit these internally in the hull more as an ornamental thing to make the hull appear as it was when it was originally built.
From the start I planned to restore the vessel as close to original as possible but using some modern techniques and materials to make it a more durable and usable boat. Boat building technology has progressed a lot since the 1940’s and I wanted 011-118 to be a boat which is used on the water and doesn’t have the regular maintenance issues of a traditionally built wooden hull.
I had deviated away from the original method of construction when unable to obtain twenty four foot lengths of marine ply as had been used on the sides of the hull originally. Instead I used standard 2400mm x 1200mm sheets so the joins between sheets would be in different places to the original design. The glassing method although not to original standards would mostly disguise these joins making the sides of the hull appear to be one piece and not three. It also provided a thin waterproof layer that would slow the ageing processes of the hull.
Over the past circa 75 years 011-118 has had many layers of paint and at least 2 different paint schemes. I had 2 photos of my boat, one taken in the 1940’s black and white showing the upper part of the hull painted black and another photo from the 90’s showing it painted battleship grey. My intention was to restore it to its original WW2 specification. This meant red bottom to replicate the colour of antifouling, black sides with yellow numbers and a grey top. I could determine from my 1940’s photo and the paint I had found on the original pieces of the hull that the original paint scheme had grey decks, grey interior, black sides above the water and red antifouling below the water.
To get the roundel as round as possible I located the centre on the old skin and measured the distance from the centre to the outer point of the colours. I then located as accurately as possible the position of the centre of the roundel on the hull. Using a long piece of scrap wood (similar to a ruler) at one end I used a sharp nail that was placed on the centre point location as a pivot. At the measured locations on the scrap wood I located a fine point marker. As this tool was rotated around the sharp nail on the centre point, the marker left a perfect circle that could be used as a masking line.
(I installed a) Lend Lease Chev steering box and wheel. To keep the look of originality, the copper rivets, which I had saved in the early part of the restoration, required removing from the old pieces of wood, cleaning up and refitting. The boat was now held together with epoxy resin and stainless steel screws and bolts so there was no structural need for the copper nails and roves. Regardless of their functional redundancy wherever there was a copper rivet exposed originally in the hull I fitted a rivet head with about 20mm of the original nail. This would give the impression the boat was held together with copper nails and roves and would retain the original look with the strength and durability of modern materials.
The rudder and steering gear were at the point of needing to be fitted. I had the rudder and a steering wheel and box but unfortunately there were no remains of the bits that connected them for me to copy. Starting with what I had, I began the process of restoring the parts in hand and fitting them to the hull, the bits in between would evolve in time. The rudder was quite corroded and needed a serious polish starting with a grinding disc and working down to a 1200 grit wet/dry paper, fortunately the shaft where the wax rope seal sat was in good condition and required minor work.”
https://raafworkboat.com/
SignificanceRAAF 011-118 is a workboat that was built by Slazenger for the RAAF in 1945. It is a 120 02 class workboat that was manufactured for the RAAF as part of a massive war effort around the country which saw commercial and pleasure craft builders employed to build small to medium sized workboats and launches. RAAF 011-118 has gone through an impressive extensive rebuild with many new materials used in the reconstruction process. This process begun in 2005 and completed in 2022, with final works done on the propeller shaft and installing the motor in 2022. Original components restored in the vessel include 7 refurbished timbers, reused copper nails and roves, and the original rudder.
1933-1937
1935